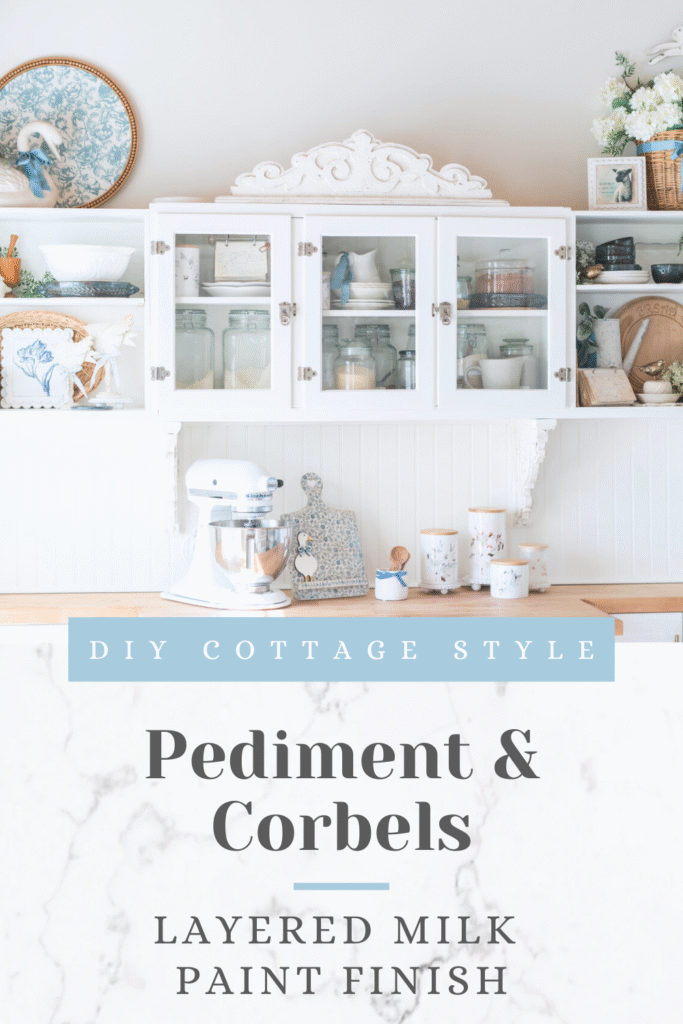
DIY Cottage Style Pediment and Corbels with a Layered Milk Paint Finish
If you’ve been looking for a way to add architectural charm to your kitchen, this DIY cottage style pediment and corbels with a layered milk paint finish might be exactly what your space needs.
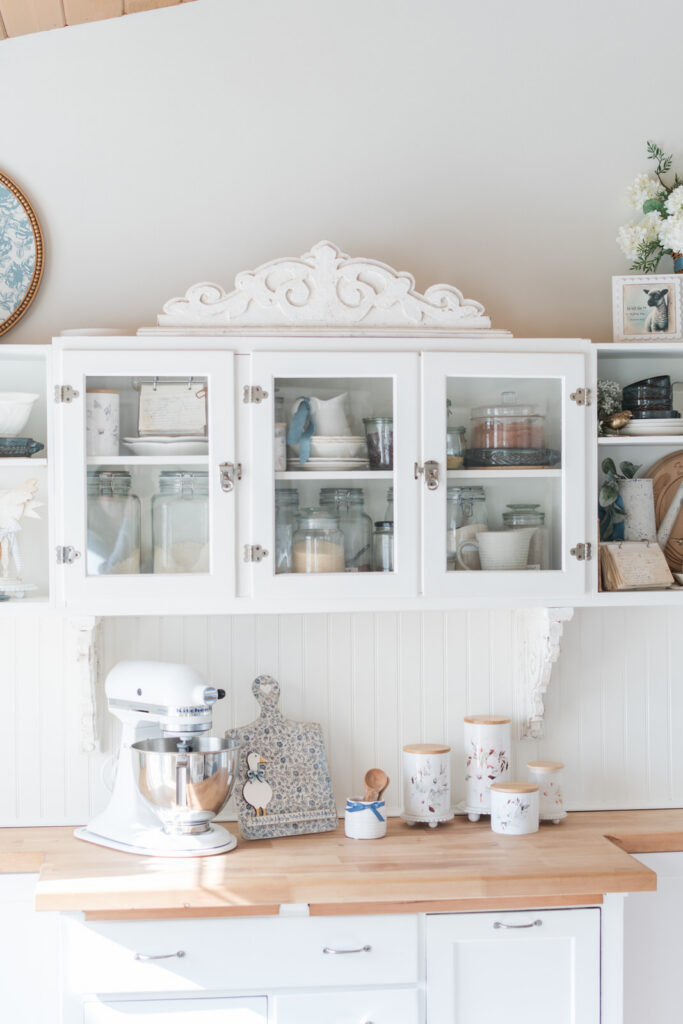
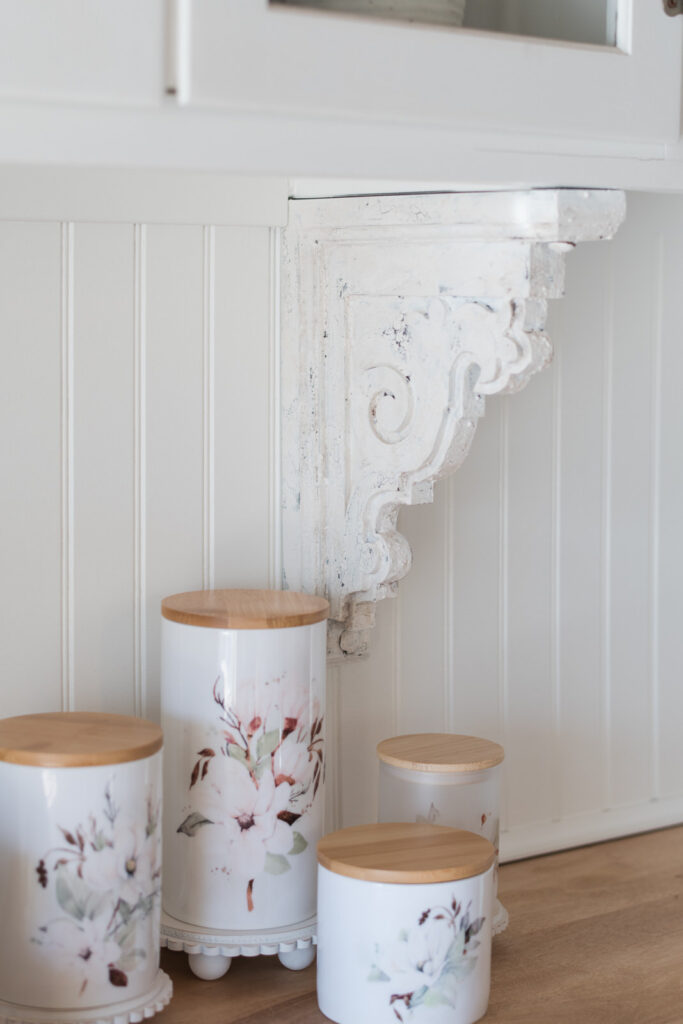
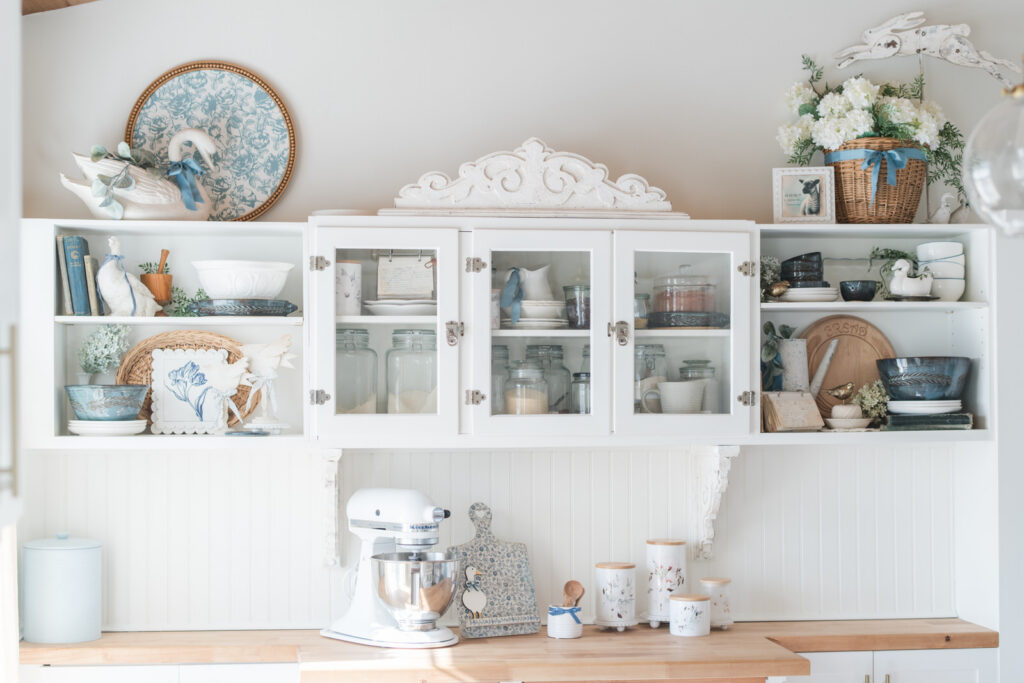
These pieces were added to our baking nook/pantry area — which we created from a vintage Hoosier cabinet in our kitchen. I wanted that space to feel built-in, collected, and timeworn. Something that looked like it had always been there.
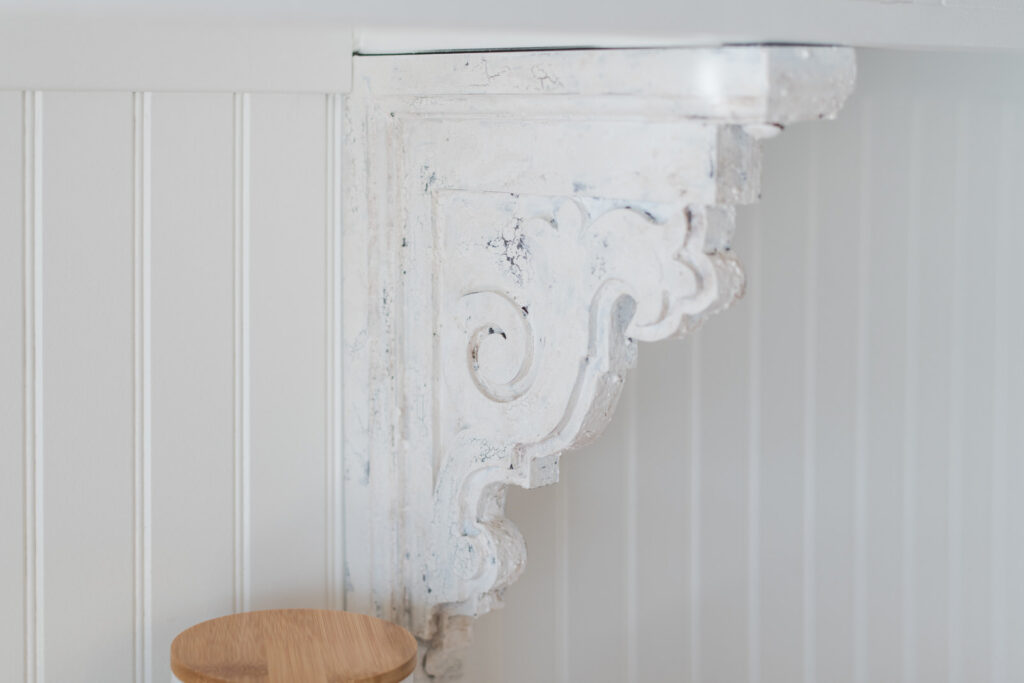
Adding a cottage-style pediment and corbels completely transformed the look. The layered milk paint finish is what gives them that aged, charming character.
And yes — I’m sharing the full process below in a video.
The Cottage Vision for Our Baking Nook
When we turned our Hoosier cabinet into a baking nook and pantry, it felt functional right away. But visually, it needed height and detail.
Cottage-style homes often feature architectural elements like:
- Decorative pediments
- Corbels under shelves
- Trim details that feel layered
- Soft, aged finishes
The pediment sits above the cabinet, drawing the eye upward. The corbels anchor the shelving and add structure. Together, they create that cozy, layered look that cottage kitchens are known for.
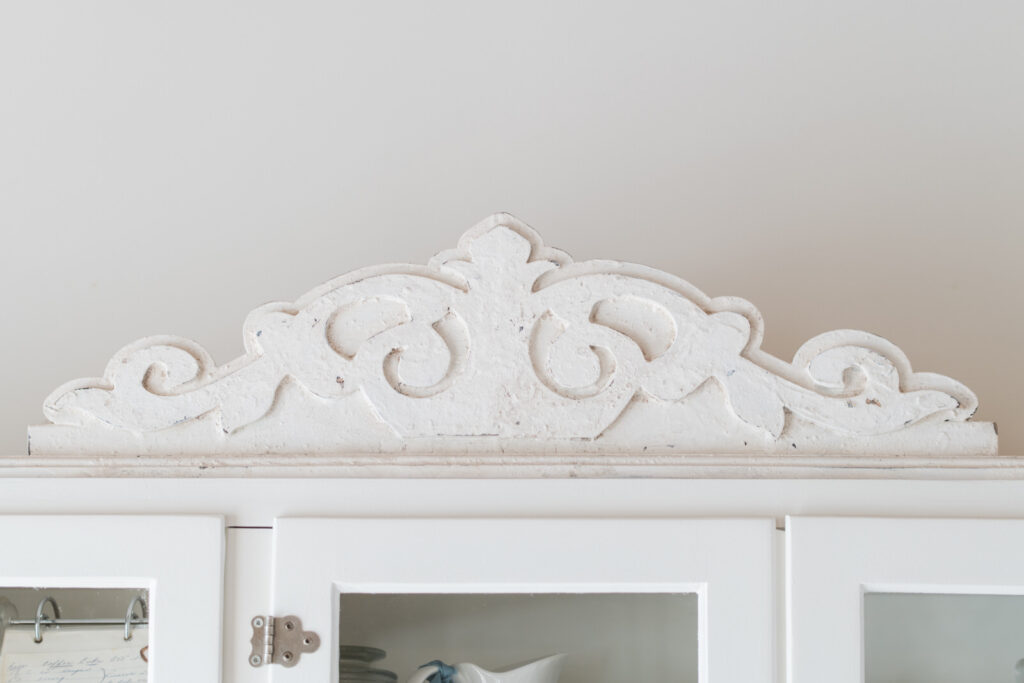
Why I Chose a Layered Milk Paint Finish
The finish is what truly brings these DIY cottage style pediment and corbels to life.
Milk paint gives a soft, matte look that feels aged without looking artificial. It has depth, texture and doesn’t look flat.
Here’s why layering works so well:
- It creates subtle contrast.
- It highlights carved details.
- It mimics natural wear over time.
- It keeps the piece from feeling newly painted.
Instead of one solid coat, layering allows the finish to feel more naturally aged.
That’s what gives it character.
How to Create a DIY Cottage Style Pediment and Corbels
This overview walks through the process. The full step-by-step demonstration is in my YouTube video below.
Step 1: Prep the Surface
Lightly sand and glue your pieces together.
Step 2: Apply the Base Layer
Start with your deeper base colour. I used dark oak stain by Samen.
This layer creates the contrast that will peek through later. Let it dry fully before moving on.
Step 3: Add a Resist
Using a simple candle, rub wax along edges and raised details.
This creates a resist so the next layer naturally chips and reveals what’s underneath.
It’s a simple technique, but it makes a big difference.
Step 4: Apply Milk Paint
Brush on over the entire surface.
Don’t aim for perfection. Let the brush strokes show slightly. That movement adds to the aged feel.
Dry with a heat gun to encourage crackling an dchipping.
Once dry, lightly sand and scarp areas where natural wear would occur:
- Edges
- Corners
- Raised areas
This is where the layered milk paint finish really begins to show.
Repeat until you have the desired coverage. It took me three coats.
Step 5: Seal and Add Depth
A clear wax seals everything in.
If you want more depth, add a small amount of antiquing wax in crevices. Wipe back excess so it doesn’t feel heavy.
The goal is softness — not harsh contrast.
Finally, add some white wax for extra contrast and highlights.
See the video here:
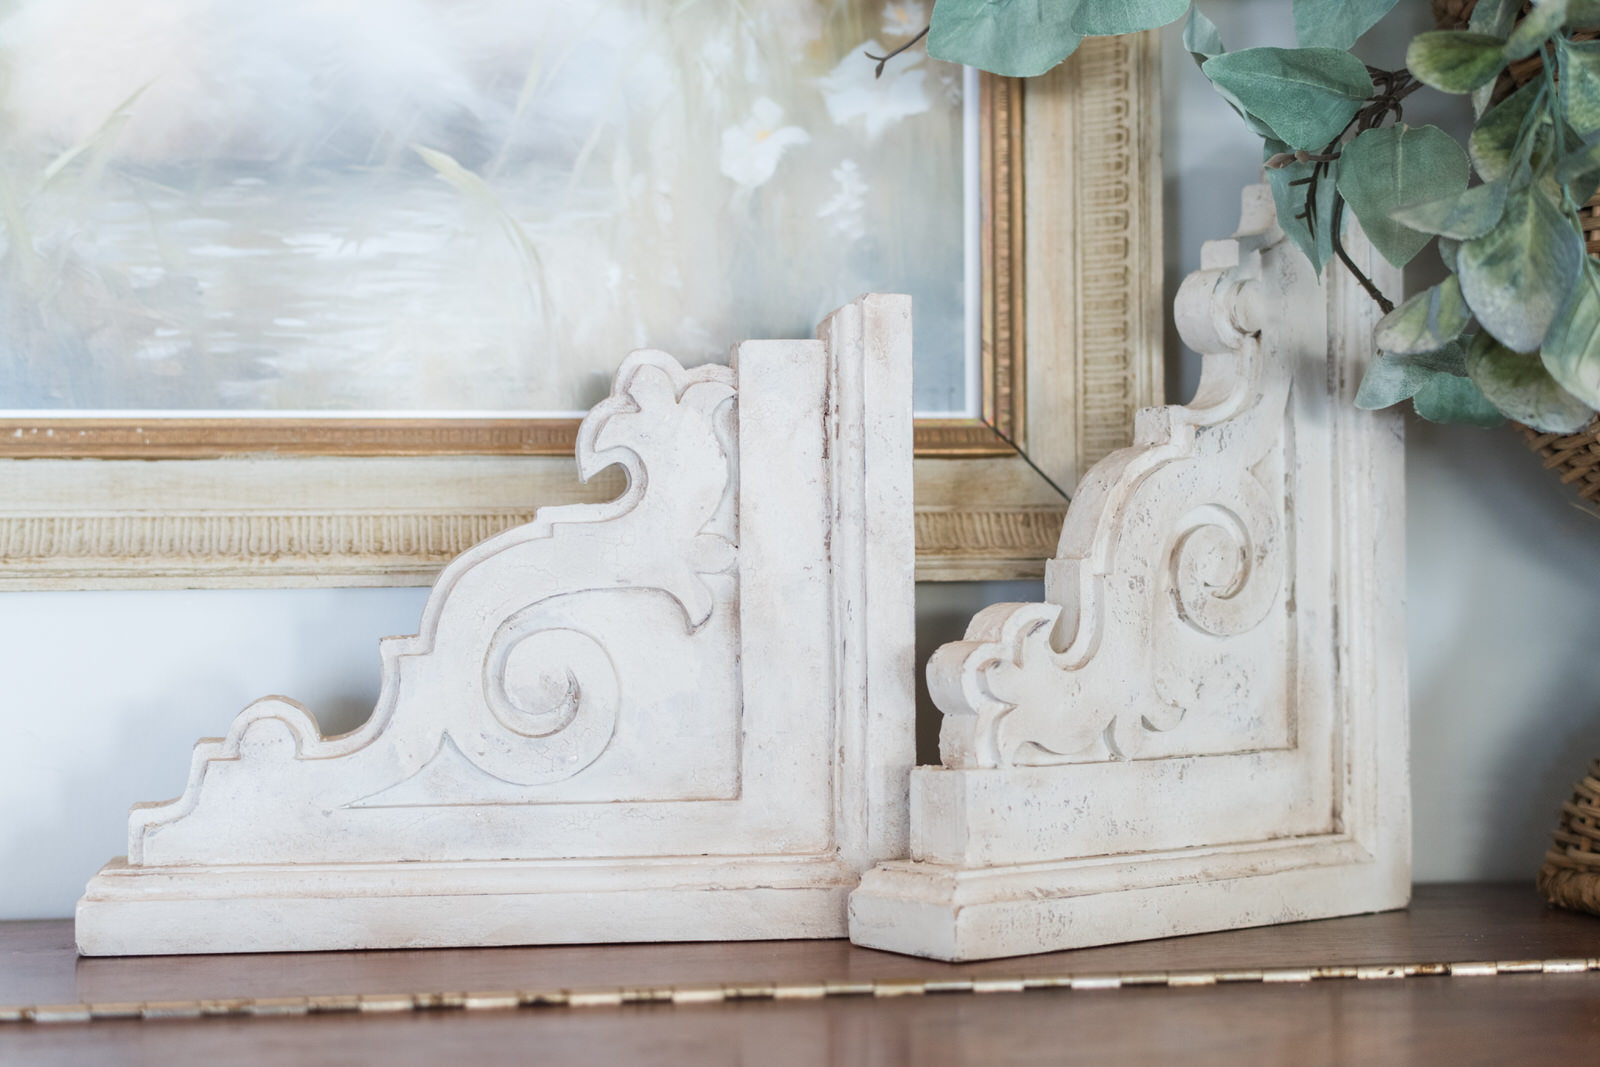
The Corbel DIY Kit
I do have a Corbel DIY Kit available in my shop. There are two styles to choose from. One features an extended base with pre-drilled holes, making it easy to secure your corbel to the wall and under a shelf. The second option has a shorter base without pre-drilled holes, which works beautifully for decorative styling or as bookends.
If you love the cottage look but don’t want to make the pieces yourself, this kit makes it simple.
The corbels are:
- Designed to work beautifully under shelving
- Perfect for kitchens, baking nooks, or hutches
- Easy to customize with your own layered milk paint finish
They’re charming — exactly the kind of detail that makes a space feel complete.
What About a Pediment DIY Kit?
Right now, I do not have the pediment available as a kit.
Because of the size, it would be more expensive to create and ship.
However, if there is enough interest, I would absolutely consider offering one.
If you would like a DIY cottage-style pediment kit, please send me a message. If enough of you are interested, I will create a listing on my website.
Styling Your Cottage Pediment and Corbels
Here are a few simple ways to style the corbel as decor:
- Add soft greenery along the shelf.
- Layer in a ceramic canister or vintage crock.
- Keep the colour palette light and warm.
- Let the architectural details shine — don’t overcrowd them.

A Beautiful Way to Add Architectural Charm
DIY cottage-style pediment and corbels are more than decorative trim.
They add visual structure, warmth, and they create that built-in feeling so many of us love.
When finished with a layered milk paint finish, they look like they’ve been part of your home for years.
If you enjoyed this project, be sure to save it to Pinterest so you can refer back to it later.
And if you’d like more cottage DIY tutorials, seasonal decorating inspiration, and early access to future kits, I’d love for you to join my email list below.
With Grace,
Kimberly